In short: A group goes through nine steps: create the employer’s contact, gather the census and terms, build and send the proposal, let the employer request an option, collect the company’s payment details, enroll the employees, submit the applications, and set up the policies. This article shows who does what at each step and what Voizee does for you.
Who is involved
| Person | Their part |
|---|---|
| You (the agent) | Build the proposal, share the links, submit the applications, set up the policies. |
| Your contact at the company (owner or HR manager) | Compares the options, requests one, passes the employee link to the staff. |
| The authorized person (often the same as your contact) | Sends the company’s bank details for the premiums. |
| Each employee | Fills in their own enrollment form. |
Every step below uses one feature described in Quote and Enroll an Employer Group. Read that article first if you have not built a group quote yet.
The routine at a glance
| Step | Who | In Voizee | What changes |
|---|---|---|---|
| 1. Create the contact | You | Leads | The company has a lead to hang the quote and deal on. |
| 2. Gather census and terms | You and your contact | Phone, notes on the lead | You know who needs which tier and what the employer pays. |
| 3. Build the proposal | You | New quote → Employer Group | Options show totals for employer and employees. |
| 4. Send the proposal | You | Publish, Email to the customer → Send email | A deal opens in the stage you chose for Quote ready (by default Quote Ready). |
| 5. The employer requests an option | Your contact | Proposal → Request this option | You get an email; the deal moves to the stage for Quote accepted (by default Quote Accepted). |
| 6. Company payment details | The authorized person | Company payment link | The details land on the contact’s lead, masked. |
| 7. Employees enroll | Each employee | Employee enrollment link | Each employee becomes a lead with an enrollment. |
| 8. Submit the applications | You | Show full details, deal stages | You move the deal to your Submitted stage. |
| 9. Set up the policies | You | Deal → Active, Add a policy | Policies and ID cards reach every employee’s wallet. |
Step by step
1. Create the contact
Add a lead for the person who decides on benefits, with their email address. The proposal, the emails to the employer and the group’s deal belong to this lead. If you work several groups, give the lead a tag with the company’s name so you find it fast.
2. Gather the census and the terms
On the first call, collect:
- every employee who will be on the plan and the coverage each needs: Employee only, Employee + spouse, Employee + children or Family;
- how many employees are eligible, the waiting period and the participation the carrier requires;
- the employer’s contribution: a percentage of each employee’s premium, or a fixed amount per employee;
- the date the coverage should start.
Keep the notes on the contact’s lead, so a colleague can pick up the group if you are away.
3. Build the proposal
- On the contact’s lead, click New quote on the Insurance panel.
- Choose Employer Group in Kind of quote.
- Fill in the Employer group card with the terms from step 2.
- Add every employee in the Employee census.
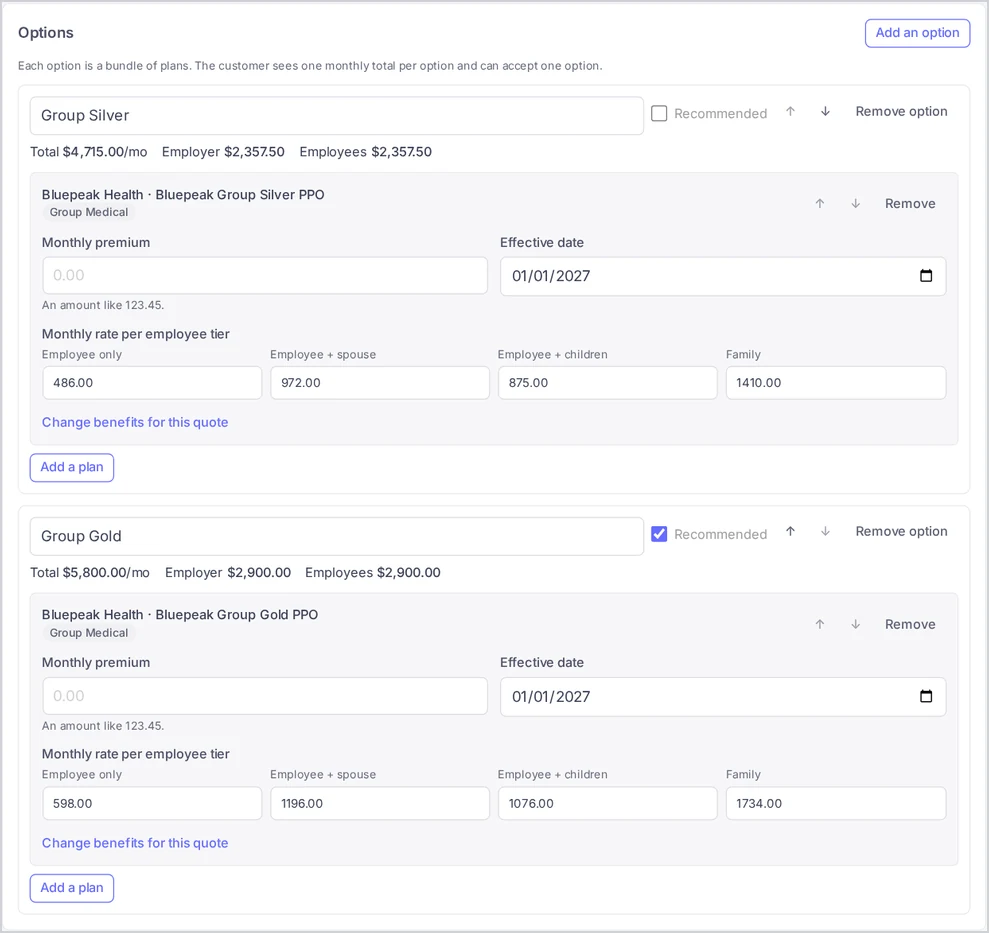
- Add two or three options. For each plan, enter the Monthly rate per employee tier. Open Carrier sites next to the title to look the rates up on the insurance companies’ websites.
- Tick Recommended on the option you suggest.
- Click Save as draft and check each option’s Total, Employer and Employees amounts.
4. Send the proposal
Click Publish. Copy the Customer link into your own message, or click Email to the customer to send it to your contact.
Publishing opens a deal for the contact in your Insurance pipeline, in the stage you chose for Quote ready. If the contact already has an open deal there, the quote joins it.
If you set a Calendar link in Insurance → Settings, the proposal shows Schedule a call, so the employer can book time with you while comparing.
5. The employer requests an option
Your contact clicks Request this option. Then:
- you get the email “Group option requested: “;
- the deal moves to the stage you chose for Quote accepted;
- with a Calendar link, your contact is taken to your calendar to book a call about the contribution, participation and final rates.
The quote is now read-only. On the call, confirm the final rates, the contribution and the start date with your contact.
6. Collect the company’s payment details
Copy the Company payment link from the quote and send it to the person authorized to act for the company. They fill in the Company payment details form: who they are, the company’s EIN, the bank account, and a signature.
You get “Company payment details received: “. The details appear on the contact’s lead card in Enrollments as Company payment details, with the account number masked.
7. Enroll the employees
Copy the Employee enrollment link and send it to your contact with a short note for the staff, for example:
“Please enroll in our new health plan by Friday: . Have your Social Security number, your driver’s license and those of family members you add at hand.”
Each employee chooses their coverage tier, fills in their details and family members, and signs. For every employee who sends the form:
- you get “Enrollment received: “ with a link to their lead;
- the employee becomes a lead, or their existing lead with the same email gets the enrollment;
- the group quote’s count goes up: “N employee(s) enrolled so far of M eligible”.
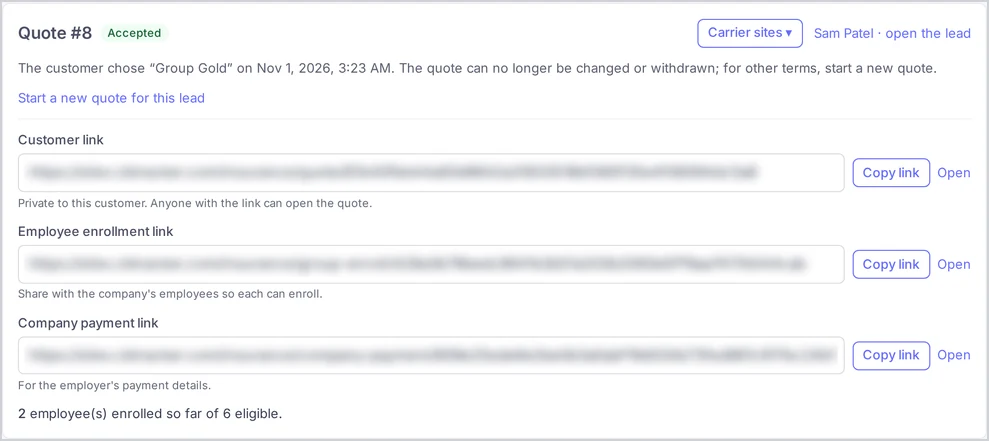
Compare the notice emails with your census. Remind your contact about the employees still missing a few days before the deadline.
8. Submit the applications
When the employees have enrolled:
- Open each employee’s lead → Insurance panel → Enrollments → Show full details, and submit their application to the insurance company. Only people with the reveal right see this button. See Protect Sensitive Customer Data.
- Use the company’s payment details from the contact’s lead the same way.
- Move the group’s deal to the stage you chose for Submitted to the carrier.
9. Set up the policies
When the insurance company confirms the coverage:
- Move the group’s deal to your Active stage. Voizee drafts policies for the plans of the requested option on the contact’s lead.
- On each employee’s lead, click Add a policy, pick the plan, and fill in the member ID, group number, effective date and premium. Set the status to Active.
- Attach each employee’s ID card with Attach a file.
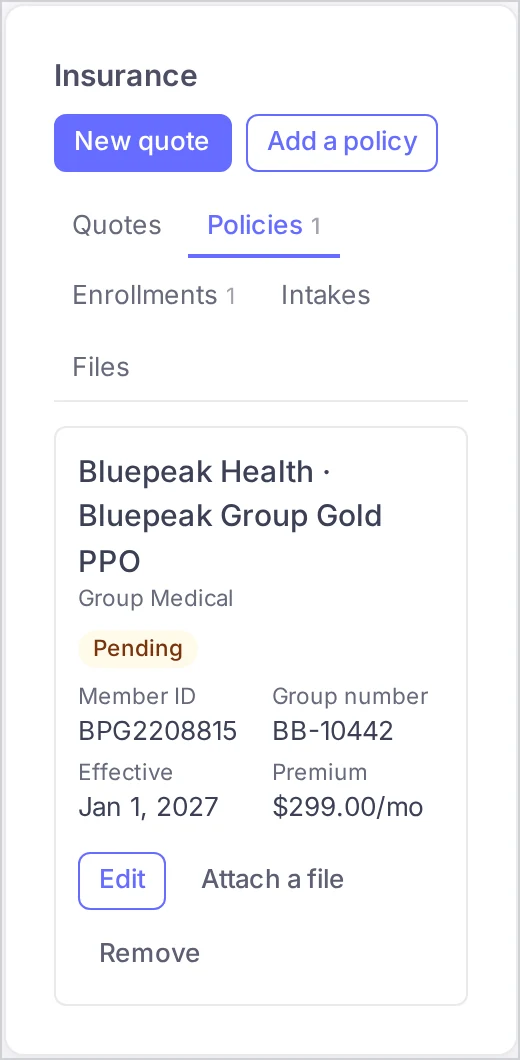
Each employee can now sign in to the insurance wallet with the email they enrolled with and see their policy and ID card. Share the Customer portal link from Insurance → Settings → Customer links with your contact for the staff. See The Customer Portal: Your Customers’ Insurance Wallet.
Tips & best practices
- One person at the company. Agree on a single contact who passes on your links and reminders. Employees respond faster to their HR manager than to an unknown agent.
- Send the employee link after the request. The link works from the moment you publish, but employees should enroll in the option the employer requested.
- Set a deadline. A date in the note to the staff gets more enrollments in the first week than an open-ended request.
- Own email addresses only. Each employee should enroll with their personal or work email, not a shared inbox: the email decides which lead gets the enrollment and who can sign in to the wallet.
- Watch the participation. “N of M eligible” shows early whether the group meets the carrier’s participation requirement.
- Tag the employees. Add a tag with the company’s name to the employee leads, so you can filter the whole group in Leads.
FAQ
An employee enrolled twice. What happens? Both enrollments are kept on their lead, and the group’s count includes both. Use the newest one.
An employee is not on the census. Can they enroll? Yes. Anyone with the employee link can fill in the form. The census only prices the options.
Can the employer change the requested option? Not on the proposal. Once an option is requested, the quote is read-only.
Do employees enter bank details? No. Only the authorized person enters the company’s bank account, on the company payment form.
Who gets the policies drafted on Active? The contact’s lead, since the group’s deal belongs to it. Employees’ own policies are added on their leads with Add a policy.
Related articles
- Quote and Enroll an Employer Group
- Track Policies on the Lead Card
- Enrollment After the Customer Accepts
- The Customer Portal: Your Customers’ Insurance Wallet
- Protect Sensitive Customer Data
- Daily Routine: New Intakes and Quote Follow-Ups
Still feeling stuck? Please send us your questions using this form.